Posts

Showing posts from 2011

Transpose a DataTable using DataSet (C#)

DataSet ds = new DataSet(); OracleDataAdapter dataAdapter = new OracleDataAdapter(); dataAdapter.SelectCommand=cmd; DataAdapter.Fill(ds); DataTableCollection collection = ds.Tables;                         DataTable table=new DataTable();                         for (int i = 0; i < collection.Count; i++)                         {                             table = collection[i];                         } DataTabel transposeTable = GetTransposeTable(table); private DataTable GetTransposeTable(DataTable dtOld)         {             DataTable dtNew = new DataTable();             dtNew.Columns.Add(new DataColumn("0", typeof(string)));             for (int i = 0; i < dtOld.Columns.Count; i++)             {                 DataRow newRow = dtNew.NewRow();                 newRow[0] = dtOld.Columns[i].ColumnName;                 for (int j = 1; j <= dtOld.Rows.Count; j++)                 {                     if (dtNew.Columns.Count < dtOld.Rows

Auto-Generating SharePoint Filenames for InfoPath 2010 on Submit

Image
SharePoint 2010 InfoPath - Auto Generating Filename on Submit Button 1. Create a filename field Create a strFilename field (Text).  Do not set any conditional formatting, rules, or data validation on this.  Add it to the canvas for now and make it read-only (Fig 1).  This will be visible for testing purposes only. You can hide this if you need to But I left it on my form as I thought it was useful.  (fig1) 2. Create Submit Data Connection Create a SUBMIT data connection in your form template that connects to the Form Library where the form resides.  Put in the URL of your Form Library for the “Document Library” field, and choose the strFilename  data element for “File name” field by using the fx button.  Check the box for “Allow overwrite if file exists” In Infopath 2010 this is done by navigating to the "Data" tab, Clicking on "Data Connections", and clicking "Add" as in (Fig 2).  (fig 2) then click next and select to submit your data "

Copy a SharePoint List Programmatically

I've been working with the SharePoint API lately. One of my tasks is to copy SharePoint lists from one site to another site. This can be done in code as long as the two sites are on the same machine. It's OK if they are in different web applications, but it can't be from one server to another. If you need to copy from one server to another, you either need to do an export/import, or find a way to save the settings and import them on the new machine. I believe you can use the SharePoint Web Services to accomplish this, though. I haven't worked with that yet. Anyway, it took a lot of digging around to figure out all the things I needed to copy lists, so I thought I'd post the code that is working for me. This post is only going to cover copying a basic list. I am planning on several more posts to handle document libraries, wikis, and other special cases. Each has their own challenges. The requirements for me are to copy the bulk of the lists of a large SharePoint

Adding, Deleting, copying and downloading attachments in SPList using C#

using (SPSite oSPsite = new SPSite(" http://website/ url/")) { using (SPWeb oSPWeb = oSPsite.OpenWeb())       {             oSPWeb.AllowUnsafeUpdates = true;             // Fetch the List             SPList list = oSPWeb.Lists["MyList"];                                 //Add a new item in the List             SPListItem itemToAdd = list.Items.Add();             itemToAdd["Title"] = "Test Title";             itemToAdd["Description"] = "Test Description";             itemToAdd.Update();             // Get the Item ID             listItemId = itemToAdd.ID;             // Update the List item by ID             SPListItem itemToUpdate = list.GetItemById(listItemId);             itemToUpdate["Description"] = "Changed Description";             itemToUpdate.Update();             // Delete List item                         // Delete List item           for (int i = list.Items.Count - 1; i

SharePoint - two different views (InfoPath User Roles)

InfoPath User Roles in Browser-Based Forms- Another Way (Part 1 of 2)  : How to Emulate User Roles in InfoPath Forms Services to Automatically Switch Views: http://sharepointsolutions.blogspot.com/2009/04/how-to-emulate-user-roles-in-infopath.html

Enable/Disable Fields using JQuery in NewForm and EditForm.aspx

Image
Hide  fields $ ( "td.ms-formlabel:contains('Type or Location')" ). parent (). hide (); ---------------------------------------- <script type="text/javascript" src="/root folder/customization/js/jquery-1.2.6.min.js"></script> <script type="text/javascript"> $(document).ready(function() { var text = $("select[title$='Quotes Attached'] :selected").text(); if(text != "Yes") { $("input[value$='OK']").attr('disabled', true); } $("select[title$='Quotes Attached']").change(function() { var text = $("select[title$='Quotes Attached'] :selected").text(); if(text == "Yes") { //alert('Please attach the Quote by clicking Attach File option'); $("input[value$='OK']").attr('disabled', false); } else { $("input[value$='OK']").attr('disabled', true); } });

Custom Form – Edit Fields Based on Permission Levels in SharePoint (Screencast)

Image
There are situations where certain fields in lists or libraries need to be hidden or displayed according to the permission level of the logged in user.  Since there is really no out-of-box way to assign permissions to fields, here's a way to do it using conditional formatting in SharePoint Designer.  This is my favorite SP Designer trick, that I discovered a few months ago. See my reference ( Ian's SharePoint Blog ): In this example, the field called "Priority" needs to be hidden from everyone except for those users who have rights as approvers on this custom list.  Also, there is a field called "Audit Date", that only approvers need to be able to edit, but other users (even those with edit rights) should not be able to edit this field, and everyone can see it. Doing this entails creating custom forms for all three forms (NewForm, DispForm, and EditForm) in the list. Here goes... 1.  To keep this simple, create a custom list called "Policies"

SharePoint Server 2007 server farm topologies

Image
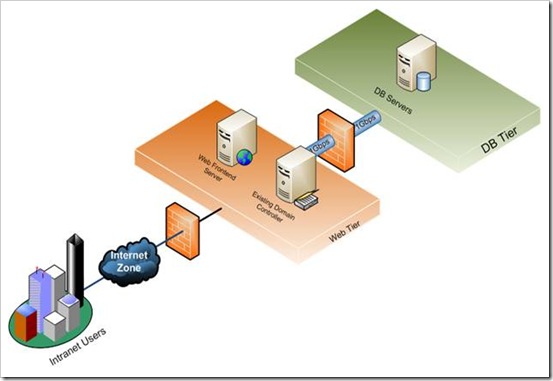
Different type of SharePoint Server 2007 server farm topologies. (System Architecture) Introduction This article discuss about understanding the different type of SharePoint server farm topologies. Overview The SharePoint Server 2007 server farm design vary based on the customer requirements, security perspective and size requirement. The topology designs can be created based on the size of the server farm namely small, medium, and large which can focus on either a single or multiple farm models. Different type SharePoint Server Roles Web Front End Server : A front-end server that provides the web services used to render applications (Presentation layer). Application Server : A front-end server that provides applications services such as search and index (Services layer) SQL Database Server : A dedicated server running either Microsoft SQL Server 2005. In large farms, this is typically a SQL Server clustered configuration with two or more servers. Domain controller : Provide au

Setup and Install SharePoint 2007 Server (MOSS) on Virtual PC

Image
Introduction This article describes how to Setup and Install SharePoint 2007 Server (MOSS 2007) on Virtual PC Background Microsoft Office SharePoint Server 2007 is a powerful technology which consists of Document management and collaboration websites. Before you start installing, Make sure that you downloaded following software’s. .NET Framework 2.0 .NET Framework 3.0 Windows SharePoint Service 3.0 Windows SharePoint Service 3.0 SP 1 Virtual PC 2007 and Windows Sever 2003 R2. The following process includes creating a new VM definition, adjusting the settings, and installing the operating system (OS) and .NET Frameworks. (Take note that this process will take about three hours.) Setup Victual PC 1. Click New... and Click Next 2. Select Create a new virtual machine. Click Next. 3. Type the name and location. The default is New Virtual Machine . To create the VM on your external hard drive, enter the location and a name called WindowsEntServer2003BaseImage . and Click Next. 4.

Free SharePoint online training resources(MOSS 2007)

http://spforsquirrels.blogspot.com/2008/05/free-sharepoint-online-training.html

Display “Append Changes to Existing Text” Fields in a Custom List Form Web Part

Image
I want to thank Brian Hunsaker for pointing this out to me. I've posted several times about the difficulties I've had in the past with displaying text fields in custom web parts where the "Append Changes to Existing Text" option is turned on. An example of this is the comments field in the test issues list: I still don't know how to get this to show up in a custom Data View Web Part, but at least, with Brian's help, I've found a line of code that will allow you to display comments with a custom list form. Here's how you add a custom list form and display the comments field within SharePoint Designer 2007. I created a blank Web Part Page as my starting point. After selecting the correct web part zone, go to Insert > SharePoint Controls > Custom List Form : For this example, I'm going to use the following options: Find the line of code that references your Comments field (the text field with "Append Changes to Existing Text&quo