How to: combine multiple projects in one WSPBuilder Solution
We frequently use WSPBuilder to package the WSP solutions. We may need multiple projects but we need to just one WSP solution. After reading WSPBuilder documentation, I found a that "BuildSolution" command doesn't work. (or may be I have not used it properly). But I have user an alternative approach.
For an illustration, I two WSPBuilder projects and already complied:
1) SimpleWorkflow
2) SimpleEventHandler
To combine multiple projects into one WSPBuidler solution (i.e. single WSP), we have to follow these steps:
STEP1: Choose any base project such as SimpleWorkflow.
Right-click on "Solution" and choose "Add Existing Project".
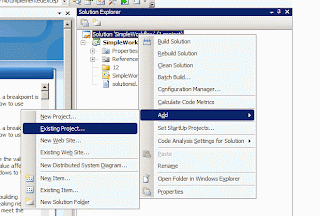
STEP2: View both the projects as shown:

STEP3: Add a new deployment project. Its better to add a completely new project just for the deployment.
Right-click on "Solution" and choose "Add New Project".


STEP4: Right click on _Deployment project, "Add New Item" >> Choose XML template and name is WSPBuilder.exe.config. (Its there from WSPBuilder documentation)
Just copy this code in WSPBuilder.exe.config
<?xml version="1.0" encoding="utf-8" ?>
<configuration>
<appSettings>
<!-- EXISTING SETTINGS -->
<!-- As in C:\Program Files\WSPTools\WSPBuilderExtensions\WSPBuilder.exe.config -->
<!--<add key="BuildDDF" value="true" /> -->
<!-- As in C:\Program Files\WSPTools\WSPBuilderExtensions\WSPBuilder.exe.config, but value changed from 3 to 4 for more feedback -->
<add key="TraceLevel" value="4" />
<!-- MIKE'S EXTRA SETTINGS -->
<!-- The following key will ensure we build in debug mode. -->
<!--<add key="BuildMode" value="Debug" /> -->
<!-- The following key will override the wsp default of files in dev GAC dir going to the gac, and those in the bin dir going to the iis site bin directory. -->
<!--<add key="DeploymentTarget" value="GAC" /> -->
<!-- The following key will create a full 12 hive in your projects, so use only if you need all deployable folders -->
<!--<add key="Createfolders" value="True" /> -->
<!-- Don't delete intermediate files such as the manifest.xml (don't add these files to source control) -->
<!--<add key="Cleanup" value="False" /> -->
<!-- New name proposed for current BuildSolution key -->
<!--<add key="BuildMultipleProjects" value="True" /> -->
<!-- Build all projects into one solution -->
<add key="BuildSolution" value="True" />
<!-- Solution path - this tells WSP builder to step back one level for the master (startup/build) project to the main 'wsp solution'
folder, and build all projects within that folder to one wsp (cab). By default this wsp will take the name of the folder it sits
in, or use the WSPName key (see below) to give your own name. Unfortunately this dictates a rigid project folder structure, so it
is advised that projects used in more than one wsp solution solutions are subsequently 'referenced/linked' in source control to
match this client build structure rather than physically copied. They can then be 'project referenced' in Visual Studio, which
leaves the option of branching them completely if required. Although this promotes re-use, care should be taken as it often
indicates a new wsp is required to prevent inadvertent upgrades or clashes with already installed features in other solutions.
If it is a variation, consider branching or copying files (especially feature.xml to ensure guid is used), dll referencing of base
feature and inheritance. -->
<add key="SolutionPath" value="..\" />
<add key="OutputPath" value="..\" />
<add key="ExcludePaths" value="..\_Deployment\"/>
</appSettings>
</configuration>
I have also added a key "ExcludePaths" and have value of "..\_Deployment".
STEP5: Build "_Deployment", compile it, and then use this command WSPBuilder >> Build WSP.
Your ONE WSP solution with two projects included.
The only small problem is in "_Deploy" does not an option for "Deploy" using WSPBuilder.

So, we have to use STSADM commands to add solution and deploy solution.
This comment has been removed by the author.
ReplyDelete