SharePoint 2010 : Migrate User Controls to SharePoint 2010
SharePoint Overview
SharePoint is a very robust and scalable Content Management and Collaboration Platform from Microsoft. It extends over the existing ASP.NET framework and provides a whole set of out of the box features for setting up well integrated websites in minutes, without any development knowledge. The soul of SharePoint is Web Parts and all users interact with the site through web parts placed into pages. There are numerous out of the box web parts that let users access the site and its features.
However, at times the out of the box functionality is not sufficient or is not customizable to the degree that one requires. Thus it becomes inevitable to build our own web parts that provide the necessary functionality.
A web part is a reusable component that can be added into any SharePoint page in any site and can be configured to perform its functions through its properties. Example of web parts could be a Slide Show Web part that displays a slide show of images in an Image Gallery in SharePoint, or a component that displays the weather whose location can be configured via a property or a stock ticker or a twitter feed web part etc.
Such web parts can be built using the ASP.NET Web Part Framework or by using the extended SharePoint Web Part framework. There are various advantages of using either method but at a beginner level, the differences are minor and hence are not discussed further here and we will build a plain vanilla ASP.NET Web Part in this article.
Microsoft has recently launched a new version of SharePoint called SharePoint 2010. The earlier version of SharePoint was SharePoint 2007 which is in use in most production systems today. There are basically two flavors of SharePoint.
• Windows SharePoint Services (WSS) 3.0 / SharePoint Foundation 2010
• Microsoft Office SharePoint Server (MOSS) 2007 / SharePoint Server 2010
WSS 3.0 is part of the SharePoint 2007 suite and the SharePoint Foundation 2010 is part of the SharePoint 2010 suite. Both are free with Windows Server and Microsoft has heard the developer’s call and made SharePoint 2010 installable on client operating systems such as Windows Vista and Windows 7 for development purposes only. However WSS 3.0 or MOSS 2007 were not installable on Vista or Win7 (sans a hack provided by Bamboo solutions.). These are stable versions of SharePoint but are more suited to smaller organizations with lower requirements.
The full version of SharePoint is MOSS 2007 of the SharePoint 2007 suite and SharePoint Server 2010 of the SharePoint 2010 suite. These are highly scalable and robust systems with support for many thousands of users and hundreds of Terabytes of data plus a host of Search, Business Intelligence and other products that make it all the more worthwhile for a large Enterprise to invest in this costly product.
SharePoint 2010 boasts of a host of new features and enhancements over its successor, SharePoint 2007. The exhaustive list of new features is beyond the scope of this article.
For the purview of the article we will build a sample ASP.NET 2.0 web part using User Controls that can be deployed to any of these versions of SharePoint. A web part can be deployed to SharePoint directly from Visual Studio but in most real world cases, it is packaged into what is called the Solution package or WSP that can be deployed and re-user in any SharePoint site.
“A WSP file is basically a .CAB file with an extension of .WSP which contains all the necessary resources that will deploy a web part or feature to a SharePoint server, including directives for entries to Web.config files and paths to which to deploy files and binaries to. Creating a WSP file manually is a cumbersome and error prone process and more automated mechanisms are usually sought after in most real world projects. Developers can install the Visual Studio Extensions for WSS (VSeWSS) which provides Project Templates for Web Parts, Site Definitions and List Definitions. Another 3rd party component which is more popular for creating WSPs is the WSPBuilder project which is a free add-on for Visual Studio and will create and deploy WSPs for us without having to create or tweak any XML or DDF files by hand. Familiarity with using the WSPBuilder is a must for any SharePoint developer at this point in time.”
A common method to develop web parts that has gained favor with developers and is also well recommended is to create ASP.NET Web User Controls and load them into a Web Part in code.
There a few pros and cons of this method which are detailed below:
Pros:
• Visual Support: User Controls can be visually designed in the Visual Studio Design editor and thus are much better to render visually than adding web controls in code behind.• Reusability: You may have existing ASP.NET User Controls which you want to deploy to your SharePoint site. Or you might want to use the same control in an ASP.NET site and a SharePoint site, for example a Chart control. Anyway, they are easily portable and easy to deploy where ever you need them.
• Developer Familiarity: Often this is an assumed or unrealized factor in most organizations but having to ramp up developers to newer technologies is a very costly affair. ASP.NET Web User Controls have been in existence since inception of ASP.NET and most developers are familiar with them (or should be).
• Debugging Friendly: User Controls can be tested and debugged in an isolated shell and not necessarily deployed to SharePoint every time a line of code is changed.
Cons:
• Performance: Although most implementations of SharePoint would not bother about the performance of loading a user control dynamically in a web part, there are few scenarios where architects would have questions about the performance of this method, especially in large installations and for a web part that is present in every single page in the site like a World Clock etc.• Packaging: Although packaging a web part is no child’s play without the use of a tool like WSPBuilder, there is one scenario where User Controls have a deployment difficulty when using a 3rd party component called the SmartPart.
“ The SmartPart is a free open source Web Part Feature for SharePoint which allows us to pick a User Control from the browser at run time. All the developer has to do is to place his User Controls (and the Code Behind files too!) into a folder inside the Site’s virtual directory and SmartPart will pick it up. Makes developing with User Controls all the more simple. No command lines, no deployment of features et. al. However, WSPBuilder in its current version does not support deploying files to custom virtual directories (other than 80) and there are documented ways to overcome this hurdle. ”
In Conclusion, using the SmartPart directly or by extending it as per your needs is usually common place in most SharePoint implementations. However, in this article, we will discuss how to create our own User Control container Web Part.
In SharePoint 2007,
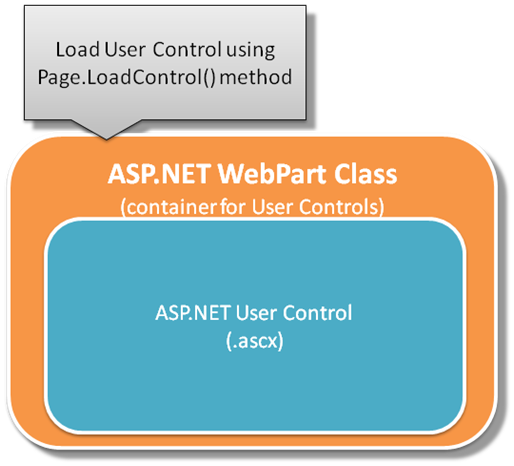
In SharePoint 2007, one had to create a web part to load and use a user control. This was a well accepted method but had packaging and deployment difficulties in having to maintain a base web part class and a separate user control class and maintain different or single assemblies (DLL’s) for each of them.
In SharePoint 2010,
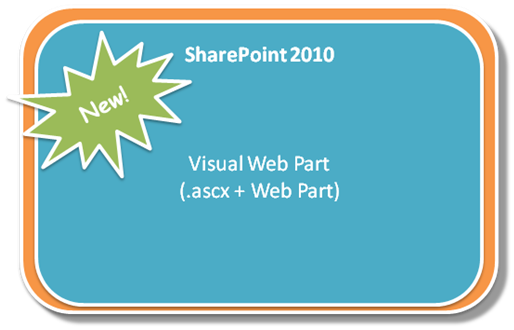
Visual Studio now supports a new type of Item Template for SharePoint 2010 called the Visual Web Part that provides all the packaging and deployment plumbing and allows the developer to visually design the web part using a User Control, add business logic and code to it and package and deploy it directly without having to manually create and manage a container web part class.
In this section, we will build a sample project for both SharePoint 2007 and SharePoint 2010 that loads a simple form to collect user information and display it in a stylized visiting card.
For the SharePoint 2007 project, we will use the most common tools for building the web part – Visual Studio 2008 and VSeWSS 3.0, v1.3 Mar 2009 CTP.
For the SharePoint 2010 project, we will use the new Visual Studio 2010 and demonstrate the Visual Web Part template type.
Visiting Card Generator - Sample Project
SharePoint 2007 Sample Project
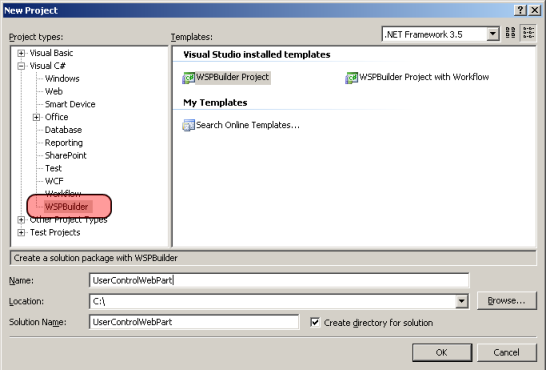
Download and install the WSPBuilder Extensions for Visual Studio 2008.1. In Visual Studio 2008, create a new project. Select your language (C#) and select WSPBuilder under it. Select the WSPBuilder Project template, specify the project path and name and click OK.
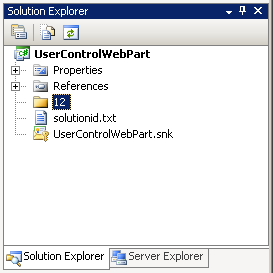
2. WSPBuilder will create a 12 folder for us. The 12 folder represents the SharePoint root folder.
“The SharePoint Root folder for SharePoint 2007 is at the following path:
C:\Program Files\Common Files\Microsoft Shared\web server extensions\12
The User Controls are stored at the following path by default:
C:\Program Files\Common Files\Microsoft Shared\web server extensions\12\TEMPLATE\CONTROLTEMPLATES.“
3. Add the folders as shown below.
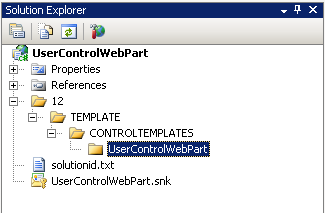
4. Under the CONTROLTEMPLATES\UserControlWebPart folder, add a New Item and select Web User Control. Name it VisitingCard.ascx.
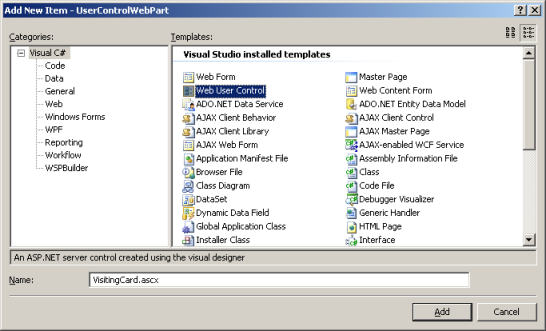
If you don’t see Web User Control in the Add New Item dialog, don’t be alarmed. By default (and strangely), the WSPBuilder project is not of the ASP.NET project type that includes Web User Controls. To get around this, follow these steps:
i. Right click on the project name in Solution Explorer and click Open Folder in Windows Explorer.
ii. Open the UserControlWebPart.csproj in Notepad or any text editor.
iii. Locate the key <ProjectTypeGuids> and prefix the following GUID as it is inside the tag: {349C5851-65DF-11DA-9384-00065B846F21};
iv. Save and close Notepad and switch to Visual Studio. It should now alert you that the Project file has been modified outside the environment. Press Reload to reload the project.
v. Now proceed normally to Add New Item and the Web User Control should be available.
5. In Solution Explorer, right click on the Project and select Add -> New Item. In the Add New Item dialog, select WSPBuilder in the left pane and select the Web Part Feature in the right pane. Give the web part a name and click OK.
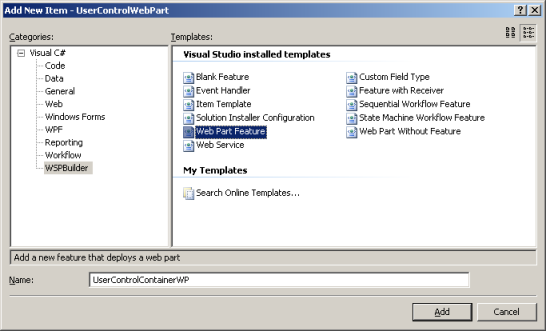
WSPBuilder will prompt you to enter a title and description for the feature. Leave these as default for now. Ensure that the Scope selected is Web meaning the feature will be deployed in the WebSite scope.
Your project structure should look like this now:
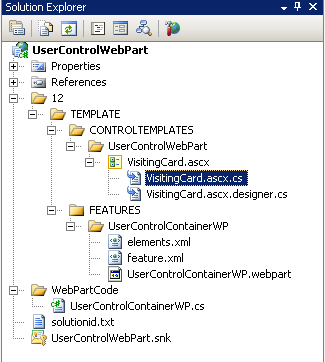
WSPBuilder will create the necessary files for a Web Part (elements.xml, .webpart file, feature.xml). It also creates a separate folder called WebPartCode and creates a class file there that will contain the code for our web part. The class file is prepopulated with some sample code.
6. Update the @Control directive in the VisitingCard.ascx with the fully qualified path to the project’s DLL, as in the illustration below. Update the namespace in the VisitingCard.ascx.cs and VisitingCard.ascx.designer.cs appropriately.
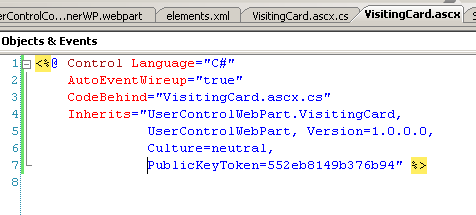
An easy way to obtain the fully qualified name for the DLL:
i. Open the UserControlContainerWP.webpart file.
ii. Locate the key <type> under <metaData/>.
iii. The 2nd half of the string value “name” (after the comma) is the fully qualified name of the DLL that this project will build. Copy and append it to the Inherits attribute in the VisitingCard.ascx’s @Control directive.
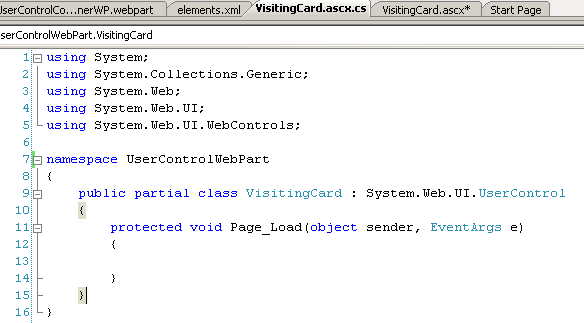
7. The Web Part we added is our container web part where we will load our user control in code in the WebPartCode/UserControlContainerWP.cs file as shown below.
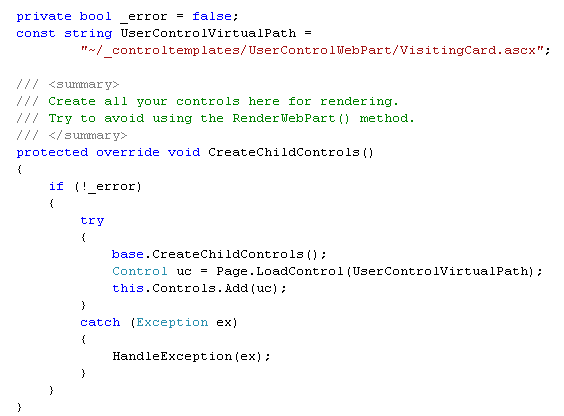
8. We now proceed to create the controls in the User Control and add code to the code behind file for the control. This can be viewed in the sample code provided.
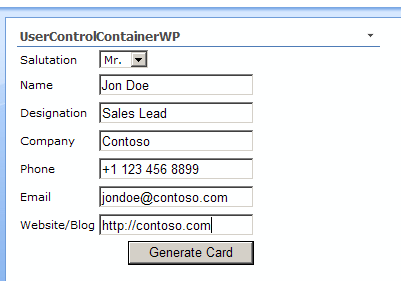
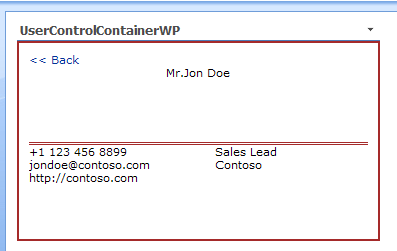
We will add a couple of panels – one with form fields to collect user data and another with a customized view to display the visiting card with user information. In the code behind for the User Control, we will add button click handlers to collect the data entered by the user and display them in a predefined visiting card panel.
9. Right click on the project name in Solution Explorer and click WSPBuilder->Build WSP. WSPBuilder will build the solution and create a solution package (WSP) and save it in the project folder.
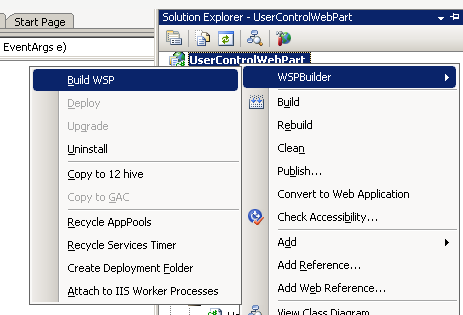
10. Again, right click on the project in the Solution Explorer and click WSPBuilder -> Deploy. WSPBuilder will deploy the Web Part and the User Control to the 12 Hive, the DLL to the GAC and make a SafeControl entry in the web.config of all available SharePoint sites.
11. Open your browser and navigate to your SharePoint site. Login if necessary (as a Site Collection Admin) and go to Site Actions -> Site Settings -> Site Features to show a list of Features deployed to the site. Our UserControlContainerWP must be listed here if the deployment succeeded. Click on Activate to activate the feature and make the web part available for the site.
12. Navigate back to the Homepage of the site. Click Site Actions -> Edit Page. Once the page loads in Edit Mode, click on Add a Web Part in any Web Part Zone.
13. Select our UserControlContainerWP from the window that pops up and click Add.
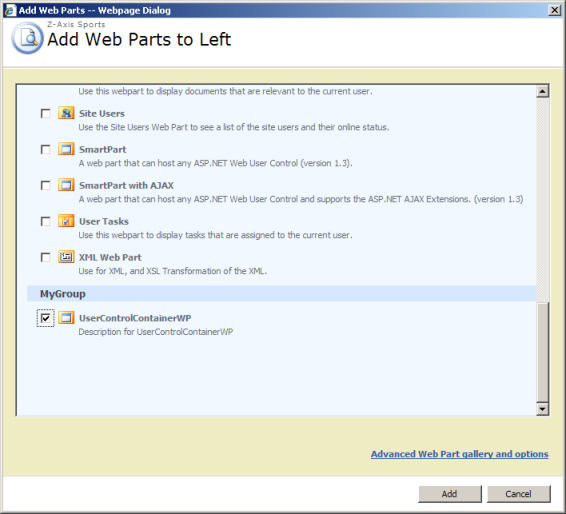
14. Our web part is added to the page and must be visible if there are no errors. Click on Exit Edit Mode in the top right. The web part must be visible as show below.
SharePoint 2010 Visual Web Part Sample Project
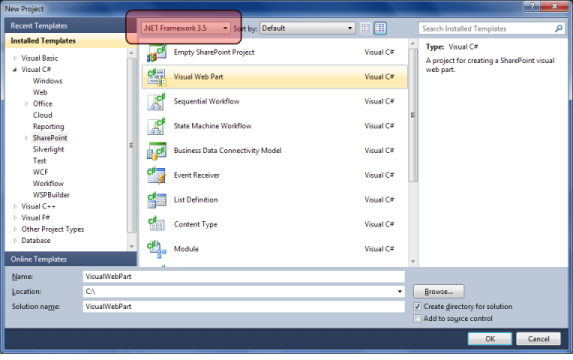
Make sure that SharePoint 2010 (SharePoint Foundation 2010 or SharePoint Server 2010) is installed on the same machine that you will be developing on. In our sample, SharePoint Server 2010 is installed on a Win 7 x64 bit machine. Although Win 7 is not supported by Microsoft for SharePoint, it is accepted to install it on client machines having Vista and Win 7 for Development purposes only.1. Create a new project in Visual Studio 2010. Select your preferred language (C#/VB) and select SharePoint in the left pane. This displays the available VS 2010 templates for SharePoint. Select Visual Web Part and click OK.
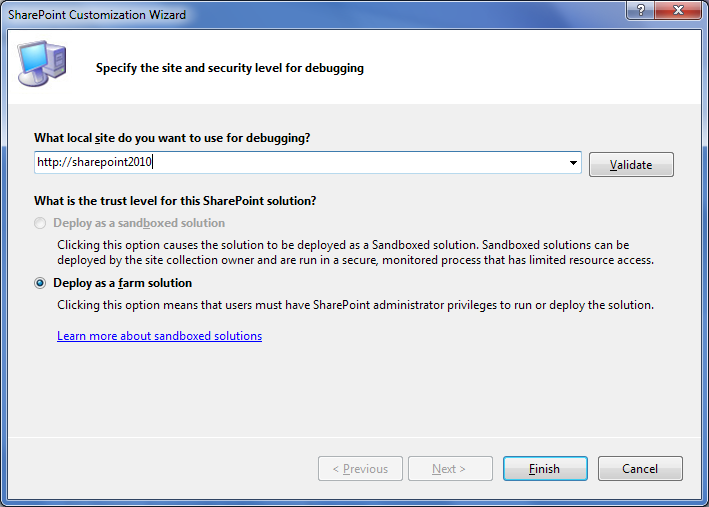
2. Visual Studio will now prompt you for the deployment URL and a trust level. Sandboxed solutions are a new feature of SharePoint 2010 but let’s just move on with a regular Farm Deployment solution as in the old days.
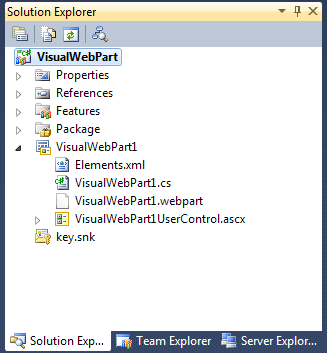
3. VS2010 creates the Solution structure for us (screenshot above) and creates the user controls and code behind files for us, plus the necessary .webpart file and the Elements.xml which will be used for packaging and deployment.
4. The User Control can be customized as usual by using the Visual Studio design mode by dragging and dropping controls from the Toolbox. The necessary headers and directives are already added to the User Control.
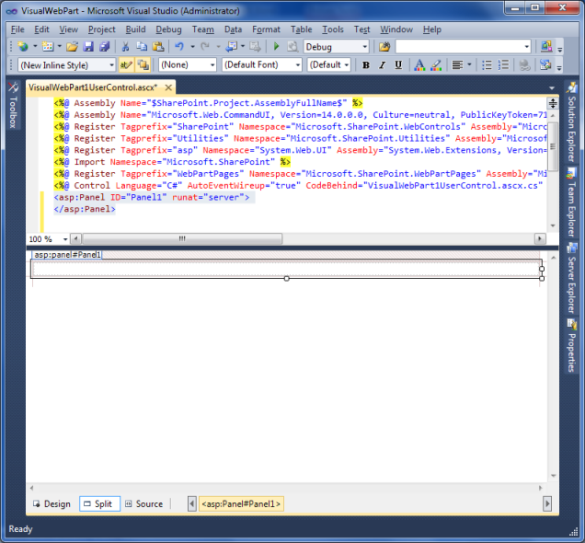
We will now proceed with the coding and design of the control. The sample code for the same is available. The code is similar to the SharePoint 2007 project.
5. Build and deploy the web part using Visual Studio. If you had set the Deployment URL correctly in Step 2, the web part should deploy the WebPart and User Control files to their respective locations in the SharePoint root directory, the DLL to the GAC and make necessary safe control entries to the SharePoint site’s web.config file.
Note: For SharePoint 2010, the SharePoint Root will have the following path:
C:\Program Files\Common Files\Microsoft Shared\Web Server Extensions\14\TEMPLATE
The User Control (.ascx) file will be deployed to a folder within the CONTROLTEMPLATES folder inside the SharePoint Root. The WebPart files will be deployed to a folder within the FEATURES folder inside the SharePoint Root.
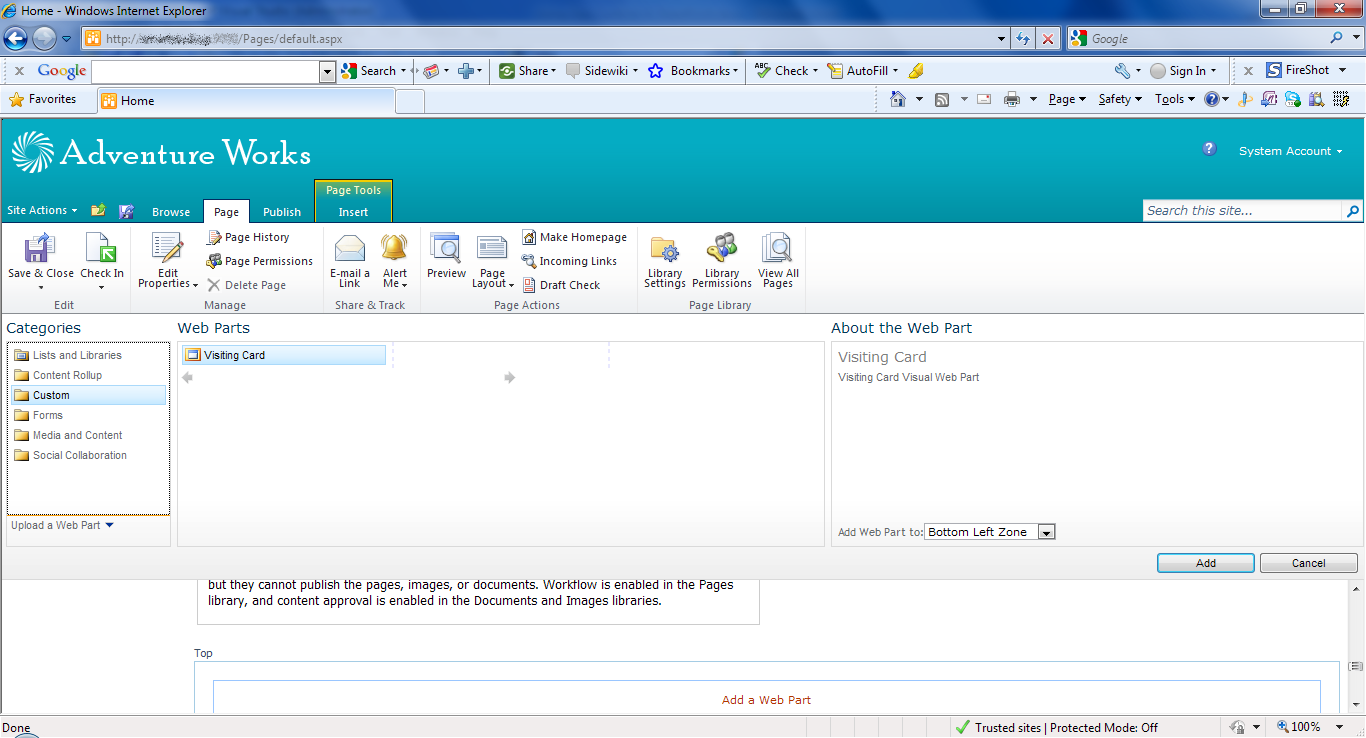
6. Once deployment succeeds, VS will launch the site in the browser. Edit the page from the Site Actions menu and Click on Add Web Part in any Web Part Zone.
SharePoint 2010’s UI has been completely revamped to include the Office like Contextual Ribbon for selecting actions based on what is selected in the Page. (Screenshot above)
7. Add the Web Part to the page. Ours is titled Visiting Card. Click on Save & Close to save the changes and close the Editing Toolbar.
8. The Web Part is visible in the page and can be used as designed.
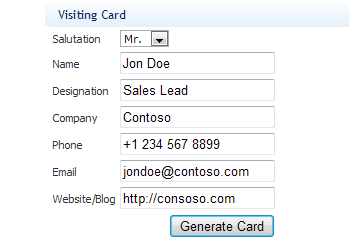
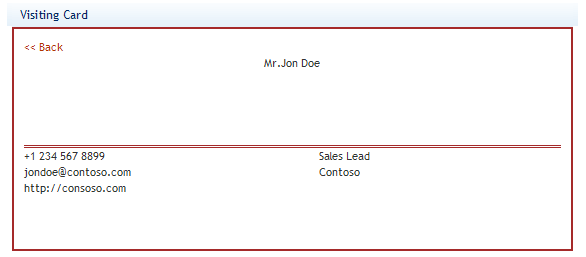
Although Jon Doe cannot expect to win many leads with that card design, for the purpose of this sample project, he will have to make some adjustments.
As can be seen from the above steps, we did not create a container Web Part to load the User Control dynamically as we did with the SharePoint 2007 Project. That is the exact advantage of using the Visual Web Part item template in Visual Studio 2010 for SharePoint 2010. Visual Studio even creates a .WSP Solution file for us to manually deploy the Web Part to any SharePoint site. The WSP file is stored in the project’s Bin folder.
Conclusion
SharePoint is a highly customizable, scalable and robust Content Management & Collaboration System that integrates well with existing systems and applications such as Active Directory and Office Applications.In this article, we have seen the different versions and flavors of SharePoint that are available.
We discussed about a common method of developing on the SharePoint platform – through the use of Web User Controls. We detailed the Pros and Cons of using this method for development.
We have discussed in detail about the development and use of Web User Controls in SharePoint Web Parts for both versions of SharePoint – 2007 and 2010. In SharePoint 2007, one had to create a Web Part Feature and in the code for it, load the User Control and add it to the web part. This was an accepted means to develop on SharePoint 2007. This however had few rough areas that were ironed out in SharePoint 2010. SharePoint 2010 provides an Out of the Box solution to add and deploy User Controls in Web parts through the use of Visual Web Parts.
We have also seen how to use the SharePoint developer’s favorite deployment plug-in – WSPBuilder.
To conclude, developing for SharePoint using User Controls is a common method of development and is supported in all versions of SharePoint, although SharePoint 2010 provides some enhancements to this process.
Comments
Post a Comment