Filtering with Web Part Connections
Please review http://www.nothingbutsharepoint.com/2010/08/25/sharepoint-filtering-with-web-part-connections-aspx/
-----------------------------------------------------------------------------------------------------------------
SharePoint: Filtering with Web Part Connections
 Have you ever noticed the ‘Connections’ option on web parts and wondered what it was meant to do? Have you played with it a bit, tried connecting one thing to another only to have nothing happen? Did you do a web search to try to figure it out and come back with results like "Connection Interface Pair: ICellProvider, ICellConsumer" and then give up, just to assume that was something you needed Sharepoint Designer to master (and you don’t have Sharepoint Designer?) Welcome to the club!
Turns out creating a ‘connection interface’ between web parts is really simple; the hardest part is visualizing the purpose! It seems to me the best way to get the idea across is just to throw a few examples out there, run through the basics and hopefully that will be enough to get your wheels rolling with the concept.
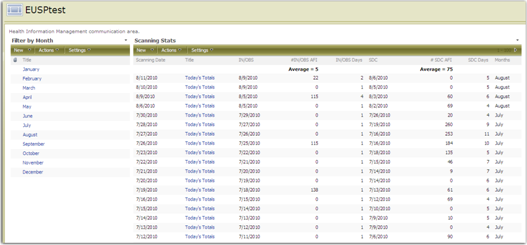
Below is an example showing an abbreviated view of a list of stats we collect to monitor productivity:
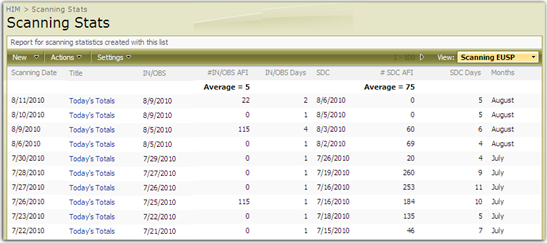
This list actually deals with a number of issues I see people struggle with on Stump the Panel, so I’ll walk you through the capture of the information, just in case it helps to explain some other questions that might arise.
Here is what the New Item entry looks like:
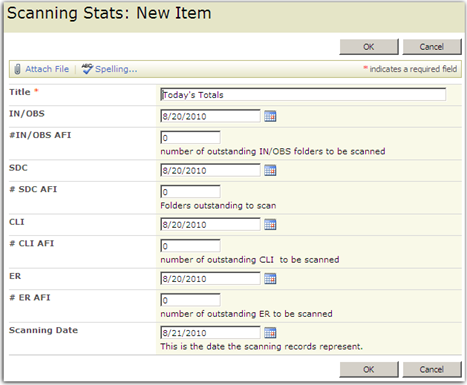
It is best practice to never delete the Title column, so when it really isn’t needed, I just set the default to a generic value, in this case "Today’s Totals" since it has information in it, no one messes with changing it, and it wouldn’t matter if they did. The date fields all use another default based on a calculated value in a Date and Time column:
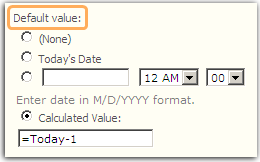
Note the use of ‘Today’ in the default value. Investigation into using [Today] in a calculated column might make the end-user leery of using ‘Today’ at all. Rest assured though, capturing today’s date as a default value is stable, since it will not change (to a new �today�s date�) even if the list item is later edited. Using default settings encourages end-user adoption because it makes filling out the information much quicker (and generally more accurate!) Using another calculated column, I capture how many days between dates and that looks something like this:
=[Scanning Date]-[Date Entered]
[Scanning Date] is the default of ‘Today’, [Date Entered] is the date we are capturing with a default of T-1, but it may be edited to hold other dates when holidays need to be factored in.
[Scanning Date] is the default of ‘Today’, [Date Entered] is the date we are capturing with a default of T-1, but it may be edited to hold other dates when holidays need to be factored in.
The other fields are quickly completed by entering the number of folders they need to record for the day. Terrific, easy to fill out form, now we are capturing data, looks good!
Then management asks for monthly average reports on those folder numbers.
Filter to just a month? Of course 12 different views of the list can be created, each filtering on the name of the month. No matter how we go about it, first is to create a column that returns the name of the month. Using a calculated column, that is pretty easy to sort out and looks something like this:
=TEXT([Scanning Date],"MMMM")
This formula converts the date entry into text. Using MMM will result in abbreviated month names, MMMM gives the text name in full.
This formula converts the date entry into text. Using MMM will result in abbreviated month names, MMMM gives the text name in full.
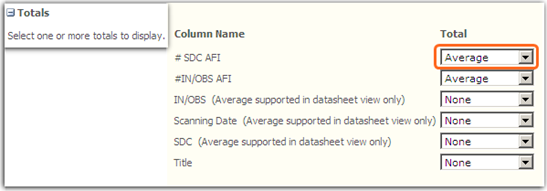
Sharepoint handles averages with the aid of ‘Totals’ that can be created under Modify/Create View. Notice that some of the columns listed below will only support averages in datasheet view. That is because they were built on calculated columns. Web part connections also work in datasheet format but all connected web parts must be displayed as Datasheet.
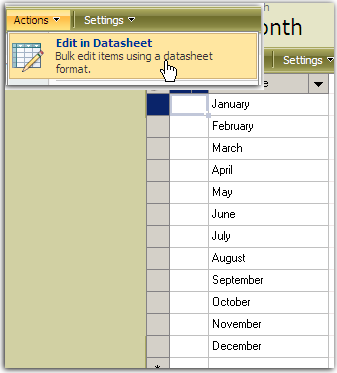
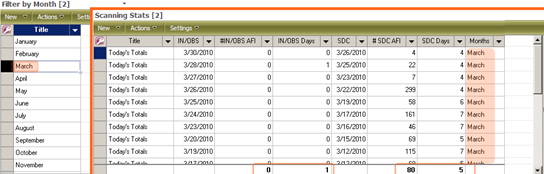
Here is where it gets interesting. Create a second custom list called "Filter by Month." Edit the list in Datasheet format to quickly enter the text names of the 12 months.
Below I’ve added both lists on a web part page. It will work on the default list page as well; just add the second list above the first.
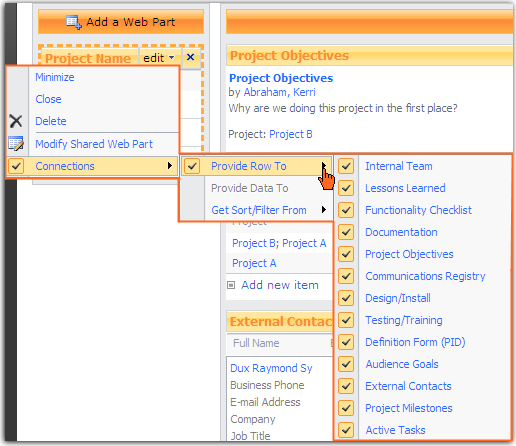
In order to see ‘Connections’, the page must be in Edit Mode, so either Modify Web Part, or choose to Edit the Page. Choose Connections > Provide Row To. ‘Get Sort/Filter From’ is the other option and it works much the same way as I describe here only in reverse.
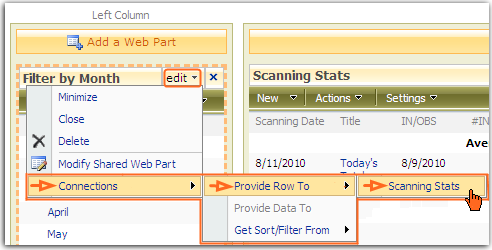
There are only 2 lists here, so the only option of making a connection is the Scanning Stats list. The need is to sort by month, which is the Title column, so use the Webpage Dialog and pick Title.

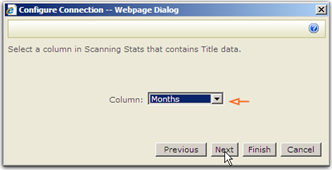
Next pick the column that contains the same data values as the first column, which is the Months column that lists out the full text names of the months. Both columns must be visible on the screen in order to create the connection.
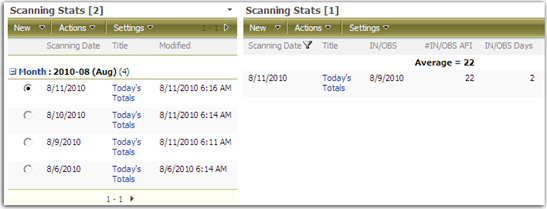
Click Next (or Finish) and check out the Filter by Month list:
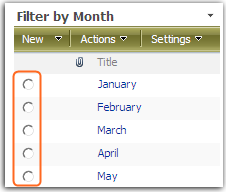
Choose the month to filter on by clicking within the circle.
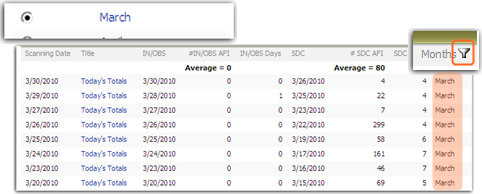
Notice the filter icon showing above the Months column; it is pretty obvious what is happening there, just as if we had filtered using the drop down options at the top of every column.
Very cool, but there are few oddities I’ve discovered. First of all, the list can no longer be changed to Datasheet format, so if that is an option regularly accessed, consider building the connection with a datasheet to start with. Notice in the example below, connecting the same web parts as above but with datasheet views, that the circles to choose are no longer there. In datasheet views just click the column entry to filter. Also take note that the averages of the calculated columns are also present.
These datasheet views with web part connections open up endless filtering options. Datasheet views allow instant entry creation, so any data can be instantly entered in the Filter list and then click it to filter the list on that value.
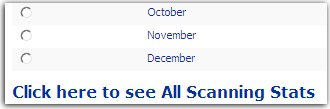
Another odd thing: unless we navigate away from the page and re-enter, there seems to be no easy way to go back to an unfiltered view of the list. The URL holds the secret of what is up with that. I have found that providing a link to the .aspx page is all that is needed. How? Grab the URL from the page where the connections are placed prior to initiating any filtering. Add a Content Editor Web Part and add a title in text that indicates what clicking there might do. Add a hyperlink to the text using the URL you just copied and hide the title of the web part (to clean up the appearance.) I added the link below the filtering options:
One other discovery: I got stuck in a loop of never ending error messages when I tried to use the filter column in Preview Pane view. It works fine if the list holding the data is in preview pane, so keep that in mind.
You don’t need to use a separate list to create web part connections.
Maybe you need to display a most recent date. In this example I’ve used a variation of the month calculated column to return the most recent month and year. I called it Month, it looks like this:
=TEXT([Scanning Date],"yyyy-mm (MMM)")
This forces the year display so we can be sure of the most recent year.
This forces the year display so we can be sure of the most recent year.
This time add two of the same web parts to the page. I’ve modify the view to ‘group’ the Month column, this makes the most sense for my entries. It is possible to do the same thing with ‘modified’ if you want to group by a day. I’ve restricted the results coming back on my column I plan to filter with these settings:
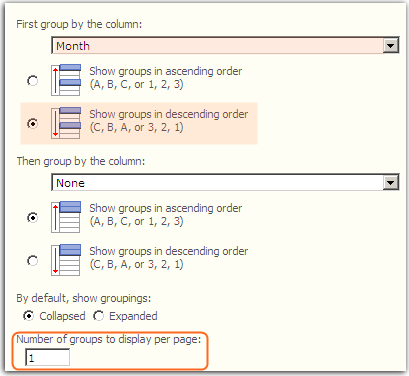
Making sure I have the two ‘Month’ columns both displaying in each list, I create the connection between them. Because I have the filtering web part set on 1 group to return, those are the only results appearing in that filtering column and users can pick the specific date by expanding the grouped items. Filtering on recent date has proven a real challenge to me in the past without the use of Sharepoint Designer.
Connect multiple web parts and filter them on a common value.
Lastly, one more example and the origins of this connections discovery: my project management template. If you haven’t yet been turned on to Dux Raymond Sy, check out his project management resources on his blog MeetDux. Dux is passionate about getting the word out on using Sharepoint for Project Management, he spoke, I listened, and every one took notice.
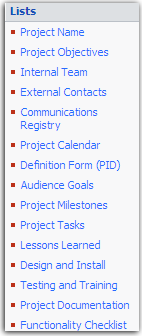
Fourteen of the web parts shown in the picture to the left represent the lists from my original project management template and detail requirements capture for our PM process. All that was needed was to create a site based o the template that included these lists and some base content. Management was thrilled with the results. So thrilled, it turns out, that they (and the project managers) wanted to use the same method for smaller projects. I have to admit, I had been stumped as to how to do that (again completely out of the box) until it occurred to me how to use web part connections to get the job done.
The first web part here is the key. I created a ‘Project Name’ list. This list captures the project name, the project lead, and a yes or no column asking if the project is to be archived. The archive column allows me an easy way to filter projects off the list when they are no longer active.
Then I needed to create a site column which references this Project Name list as a lookup column.
From there I added the new site column to every one of the original 14 lists. Adding all the web parts to a web part page, making sure the new column was visible in each, and then creating the connections to each was all that was needed.
But imagine scrolling through that mess, even with connected web part filtering you might be thinking that can’t possibly be enjoyable for the user. Christophe from Path to Sharepoint provides the ideal solution with Easy Tabs; and they work perfectly with web part connections! Someone recently said via Twitter "If you aren’t using Easy Tabs, you are missing out!" I totally agree, best feature I can think of to expand my Sharepoint solutions.
The end result: (click to see full size)

Users can filter by project and click through the tabs to see only the information that pertains to that project. Now we have nearly the same project management solution for smaller related projects as we do for our larger ones. This in turn increases site usability by keeping all the elements in a familiar place and it eliminates rework since information for one related project can be assigned to another project by simply adding that project name to content.
Hopefully these examples will get your juices flowing on ideas for using these odd little connections. Tell me about how you are using them; I’d love to hear from you. Leave a comment!
Comments
Post a Comment